How to Use a Dive Float to Signal Your Position While Spearfishing
Introduction
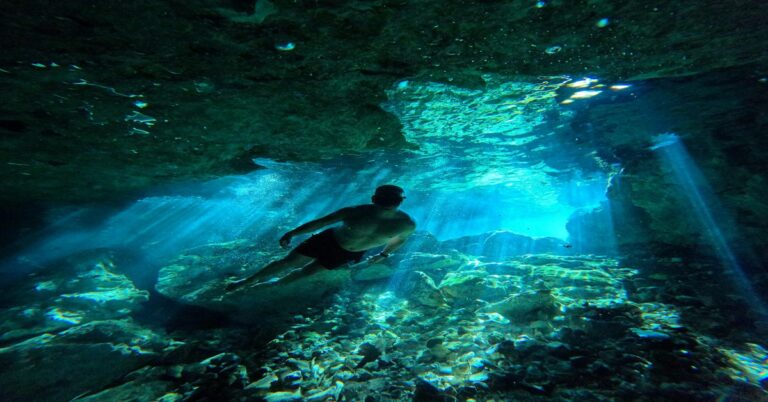
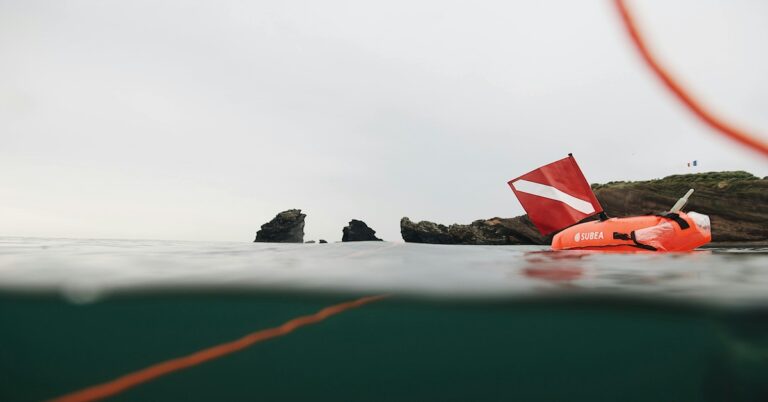
If you spend any time spearfishing offshore or in areas with boat traffic, a properly set up dive float isn’t just a convenience—it’s one of the most important pieces of safety gear you’ll own. I learned this early on, during a choppy afternoon off the coast. I was drifting a drop-off in mild current, and within 20 minutes a center console came within fifty feet of my position. I had a small inflatable float with a short flag, and the captain later said he never saw it until he was almost on top of me. That day, I committed to understanding how to properly signal my position using a spearfishing dive float.
This article covers everything you need to know: how to choose the right float, how to rig it for maximum visibility, how to use it to mark your drift, and the common mistakes that can leave you invisible at the worst possible moment. Whether you’re shore diving or spending the day on the drift, this guide will help you stay visible and in control.

Why Signaling Your Position Matters
Spearfishing puts you in the water for extended periods, often drifting silently below the surface. Without a good signal, you’re invisible to boaters and other divers. That’s a recipe for disaster in high-traffic areas.
A dive float serves several practical purposes. It marks your position for boats—most boating incidents involving divers happen because the flag was too low or the float was too small. It marks your drift, showing you where you started and how far you’ve moved. And it signals other divers, helping you maintain orientation and avoid crossing paths dangerously if you’re hunting with a buddy.
I’ve had near-misses that were entirely preventable. One time, a tuna boat came through while I was working a pinnacle about 200 yards from a busy channel. The float caught their attention, and they gave me a wide berth. Another time, a buddy lost his small float in a rip and spent an hour trying to find his way back to the boat. Without a proper setup, you’re relying on luck.
This isn’t about fear-mongering—it’s about responsible preparation. The ocean doesn’t care how comfortable you are. It cares about physics and visibility. Get the signal right, and you buy yourself a comfortable margin of safety.
Choosing the Right Dive Float for Spearfishing
Not all dive floats are created equal. The one you choose depends on where you dive, how deep you go, and how much gear you’re carrying. Travelers who need a compact option for shore dives may prefer an inflatable model that packs down small.
There are three main types:
- Standard inflatable floats. These are the most common. They’re lightweight, packable, and affordable. I still use one for shore dives where I’m hiking in. The downside is that they can be less visible in chop and are more susceptible to punctures from gaffs or rocks.
- Hard shell floats. These are rugged, often made from UV-stabilized plastic. They hold up well to abuse and can carry more weight for flags and kill bags. But they’re bulky, harder to transport, and more expensive.
- Specialized spearfishing floats. Brands like Rob Allen and Cressi make floats specifically designed for spearfishing. They typically have reinforced attachment points, built-in flag mounts, and bungee sections. These are the best all-around option if you can afford them. I run a Rob Allen top-loader for offshore work and a small inflatable for inshore.
Size matters. For offshore drifting in moderate current, I consider a float with at least 20–25 liters of displacement to be the minimum. Larger floats (35+ liters) are better for deep dives where you’re carrying heavy fish. For shore dives, a 10-liter inflatable is usually fine. Don’t underestimate the windage: a massive float can act like a sail in strong winds, dragging you faster than you want to drift.
Costs range from about $30 for a basic inflatable to $200-plus for a premium hard shell. If you dive frequently, the investment in a good mid-range float is worth it. Cheap floats often fail within a season—seam leaks, UV degradation, or flag pole mounts that snap off. If you’re looking for a durable option, checking out spearfishing dive floats can help you compare models that hold up over time.
Essential Gear: Flags, Lines, and Clips
Your float is only as good as the equipment supporting it. You need a reliable dive flag, the right line, and secure hardware.
Dive flags. Most places require a dive-down flag (red with a white diagonal stripe) that’s at least 12 x 12 inches. I prefer a larger flag—24 x 24 inches—for better visibility. Make sure it’s made from weather-resistant material. I’ve had cheap flags shred after a few trips. Flags with a sewn sleeve for the pole hold up better than those with simple grommets. A simple way to improve your visibility setup is to look at larger dive flags that meet legal requirements.
Float line. This is where a lot of people go wrong. You want floating line, not sinking line. Sinking line can get tangled on the bottom, on rocks, or on your gun. Floating line stays on the surface and reduces drag. I use 400–500 feet of 3mm floating line for most offshore work. For shallow shore dives, 200 feet is usually enough.
Swivels and clips. Use stainless steel swivels to prevent the line from twisting. Snap hooks with a locking mechanism are far better than cheap spring clips that can open under load. I run a swivel at both ends of my float line and a high-quality snap hook at the float end for easy attachment.
Bungee section. A short section of bungee cord between the float and your gun (or belt) absorbs shock. It’s a small addition that protects your gear and your hands. I use about 18 inches of 6mm bungee with a loop at each end.
Good flags run $15–30. Float line costs $0.50–$1.00 per foot. Quality clips and swivels add another $20–30. It’s not a huge investment for something that could save your dive—or your life.

How to Rig Your Dive Float for Maximum Visibility
Here’s the setup I’ve refined over hundreds of dives. It works in moderate current and holds up well in most conditions.
- Inflate the float. If it’s an inflatable, get it firm but not over-inflated. Over-inflation puts stress on seams, especially on hot days.
- Mount the flag pole. Most floats have a dedicated mount. Slide the pole through the sleeve on the flag, then into the mount. Secure it with a clip or a small carabiner. I like a telescoping pole that extends to about 6 feet above the float. It gives the flag height, which is critical for visibility.
- Attach the float line. Connect one end to the float’s attachment point. A stainless steel swivel here reduces tangling. If your float doesn’t have a reinforced point, add a small pad or grommet to prevent wear.
- Add the bungee section. Tie or clip the bungee to the gun’s butt or a dedicated mount. Clip the other end to the float line. I keep the bungee close to the gun so it absorbs shock without pulling on the line awkwardly.
- Add a secondary clip. Attach a small snap hook or clip to the float for holding fish, a GoPro, or a surface marker. This keeps your hands free and prevents gear from floating away.
Common mistakes: using a flag pole that’s too short (under 3 feet above the float), using knots that slip under tension (learn a proper figure-eight or a uni knot), and forgetting to secure the flag so it doesn’t flap down in wind. I’ve seen a flag fold over on a float and become nearly invisible from 50 yards out.
Test your rig in calm water before heading offshore. Give the float line a hard tug. See how the flag holds up in a breeze. A few minutes of testing saves you from learning the hard way.
Using the Float to Mark Your Drift and Dive Path
Deploying your float isn’t something you do once and forget. It’s an active part of your dive plan.
Start of a drift. Drop the float at the up-current end of your intended drift path. Make sure the line is free and won’t snag on rocks or kelp. If you’re diving from a boat, have the captain drop you up-current and let the float drift with you. This keeps you in a predictable lane.
Follow the float as a reference. As you dive, keep one eye on the float. It shows you how fast you’re drifting and in which direction. If you’re hunting structure, the float helps you stay parallel to a reef edge or contour line without having to surface constantly.
Adjust line length. The deeper you dive, the more line you need out. A good rule of thumb is to have at least 1.5x the depth of the water in line deployed. For example, if you’re diving in 30 feet of water, let out about 45 feet of line. Too much line creates drag and can get tangled. Too little line and the float pulls against you, which is annoying and can spook fish.
Mono vs. spectra. I prefer spectra (braided) line for its lack of stretch and low drag in water. Mono stretches, which can be forgiving, but it also creates a droop that catches current. Spectra stays tauter and gives you a better feel for what’s happening at the surface. Frequent users may benefit from spectra float line for better performance on deep drifts.
A float isn’t a GPS marker. It moves with you. That’s the whole point. Use it to communicate your real-time position, not as a fixed buoy that you hope boaters see from a mile away.
Best Practices for Flag Placement and Visibility
The flag is your primary signal. Get it right.
Height. The flag should be at least 3 feet above the float. In choppy water, higher is better. A flag that’s only 2 feet up can disappear behind a wave from 100 yards away. I use a 6-foot telescoping pole and extend it fully in open water.
Color and pattern. Red with a white diagonal stripe is the international diver-down symbol. Don’t use other colors or patterns. Some divers add reflective tape to the pole or flag for low-light conditions. I’ve also seen small dive lights clipped to the flag pole for dawn or dusk dives.
Fixed vs. telescoping pole. Fixed poles are simpler and less likely to fail. Telescoping poles are more portable but have moving parts that can corrode. I’ve had a telescoping pole seize up after a few months in saltwater. Rinse it thoroughly after every trip. For most users, a fixed pole that breaks down into two sections is the safest bet.
Legal requirements. In many US coastal states, the flag must be at least 12 x 12 inches and displayed from a mast at least 3 feet above the water. Some states require the flag to be lit at night. Check your local regulations. Ignorance isn’t a defense if a boater files a complaint or an accident happens.
Visibility isn’t optional. If you can’t be seen, you can’t be avoided.
Common Mistakes When Using a Dive Float for Signaling
Over the years, I’ve made most of these mistakes. Maybe you can avoid them.
- Undersized float. A tiny float looks like a random piece of debris. It doesn’t command attention. In a following sea, it’s nearly invisible. I used a 5-liter inflatable on an offshore drift once. Never again. Go bigger than you think you need.
- Flag too low. This is the single most common error. A flag that’s only a foot above the float is worthless in any chop. Raise it.
- No secondary pick-up line. I always carry a small secondary line with a clip. If the main line breaks or gets tangled, I can grab the secondary and stay connected to the float. This has saved me twice—once when a line snapped on a rock, and once when a fish took the gun and dragged the float away.
- Flag tangling. A flag that wraps around the pole or gets fouled in the line is a visibility disaster. Use a swivel at the flag mount, and make sure the flag is snug on the pole. I’ve watched a flag twist itself into a wad because the grommet was too loose.
- Forgetting to attach before entering. This sounds ridiculous, but it happens. You gear up, you’re excited, you hit the water, and the float is still on the boat. Or you forgot to clip the line to your gun. Double-check your setup before you step off the edge.
Each of these mistakes has a simple fix. Build a pre-dive checklist and run through it. It takes 30 seconds and saves hours of frustration.
Dive Float vs. Other Signaling Methods: What Works Best?
There are other ways to signal your position, but not all of them are practical for a spearfishing session.
Whistles. A whistle is cheap and effective at close range, but it requires you to be alert and blow it at the right moment. A float is a constant visual presence. You don’t have to remember to use it.
Dive lights. A strobe or steady light on your float or belt works well at night or in murky water. But in bright daylight, it’s less effective. I use a light for dawn and dusk dives, but it’s a supplement, not a replacement.
Personal AIS beacons. These show your position on a chart plotter. They’re great for boaters who have AIS receivers, but they don’t help if a boat isn’t looking at electronics. They’re also expensive and require batteries.
Why a float wins. For spearfishing, a float is the most practical method because it’s always visible and doesn’t rely on batteries or electronics. It’s also low-maintenance and works in most conditions. The main limitation is that it doesn’t help much in heavy fog or rain, where a radar reflector or AIS might be better. But for 95% of dives, a properly rigged float is your best bet.
Don’t think of this as an either/or. The smartest divers use a float as a primary signal and carry a whistle and light as backups. Layered safety is the goal.
Caring for Your Dive Float and Line
Your float setup takes a beating. Saltwater, UV, sand, and sharp rocks all do damage. A little care goes a long way.
Rinse after every use. I hose down my float, flag, and line with fresh water for a few minutes. Salt crystals accelerate wear on zippers, clips, and seams. It’s the single most effective thing you can do.
Check for UV damage. UV degrades rubber, plastic, and fabric. After a season, inspect your float for cracks, fading, or stiff spots. If the inflation valve leaks or the flag material feels brittle, replace them.
Inspect lines monthly. Run the line through your fingers and look for frayed spots, nicks, or rust on clips. A frayed line can snap under tension. Replace any compromised section immediately.
Store deflated. If your float is inflatable, store it deflated and out of direct sunlight. Punctures and seam failures happen more often when a float is left fully inflated in a hot trunk for weeks.
Cheap floats often delaminate or develop pin-hole leaks within a season. I’ve seen it happen. If you dive regularly, spending a bit more on a reputable brand saves you the frustration of a failing float at the worst moment. Brands like Rob Allen, Cressi, and Riffe make gear that lasts. For a reliable option, consider checking spearfishing float flag kits that include everything you need.
When to Upgrade: Signs It’s Time for a Better Float Setup
Not every budget allows for top-of-the-line gear. But there comes a point when a cheap float becomes a safety liability.
Here are the signs:
- Seam leaks. If you have to re-inflate your float mid-dive, replace it. Seam failure is a sign of material fatigue.
- Flag pole bending. A bent pole means the flag sits lower. It also means the pole is weak and could snap if hit by a boat’s wake.
- Line tangling. If you’re constantly untangling your line, something is wrong. It could be the line quality, the swivels, or the float design. Upgrade to a quality floating line and stainless steel swivels.
- Insufficient buoyancy. If you’re diving deeper than 30 feet and your float is barely supporting the flag plus your catch, you need a larger float. It should lift easily when you’re at depth without dragging you down.
Budget-friendly alternatives exist. A good inflatable from a reputable brand might cost $50–70. That’s much less than a premium hard shell. But do not compromise on flag height or line quality. Those are essential for safety.
Upgrading is an investment in your peace of mind. Every time you see that flag bobbing on the surface, you should feel confident that boaters see it too.

Ready to Get Started? Find Your Options Here
A reliable dive float setup improves your safety and convenience on every hunt. You don’t need the most expensive gear, but you do need a setup that works in your typical conditions. Focus on getting a float with good buoyancy, a visible flag at proper height, and quality line and hardware.
If you’re ready to upgrade or build your first kit, take a look at top-rated floats and accessories from brands that divers trust. The right gear makes a real difference when you’re a mile offshore and the only thing between you and a powerboat’s propeller is a piece of red fabric on a pole.
Review curated options for spearfishing dive float kits and accessories to find choices that fit your budget and your style.